
Meshtastic for Beginners: What Is Meshtastic, and Why You Should Care in 2026
This Meshtastic for beginners guide shows you how to build an off-grid LoRa mesh network for under $35 — no cell tower, no ham license, no monthly bill. Meshtastic is an open-source project that turns cheap LoRa radio boards into a decentralized mesh network. Each node you power on becomes part of the network, relaying messages for every other node around it. The more nodes you add, the further the network reaches.
For readers who already follow my ham radio license guide and home lab posts, think of Meshtastic as the bridge between the two worlds. It uses radio frequencies like your Baofeng or GMRS radio, but it runs on license-free ISM bands and automates the mesh routing the way your self-hosted Home Assistant install automates your lights. No calling CQ, no repeater coordination, no exam to pass. You flash a board, pair your phone, and start texting.
How LoRa Mesh Differs From Ham Radio and GMRS
Ham radio and GMRS are voice-first services that require a license and use narrow channels on the VHF and UHF bands. Meshtastic is data-first. It uses LoRa (Long Range) modulation on the 915 MHz ISM band here in the United States, which falls under FCC Part 15 rules. That means it is license-free, low-power, and open to anyone. You are not talking over the air; you are sending encrypted text and telemetry packets that hop from node to node until they reach their destination.
Consider getting a ham radio license. It can fill a void when Meshtastic is not the answer in the field.
The trade-off is throughput. LoRa is slow — think a few hundred bits per second — so Meshtastic is built for short text messages, position sharing, and telemetry, not streaming audio or video. What you get in return is remarkable range on almost no power, and a network that keeps working when the internet and cell networks do not.
What You Need to Build Your First Meshtastic Node
The barrier to entry is genuinely low. You can be on the air for under $35 total. Here is the short shopping list for a first node.
The Board: Heltec LoRa 32 V3
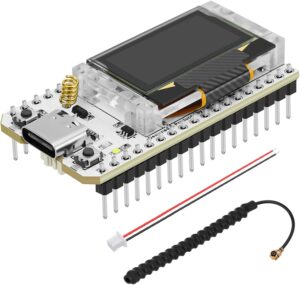
For most beginners, the Heltec LoRa 32 V3 is the right first board. It is the most popular Meshtastic node in the United States for good reason: it costs around $20–30, it uses the ESP32-S3 microcontroller and the SX1262 LoRa radio, and it has a small OLED display, USB-C for power and flashing, and a JST connector for a battery. You do not need GPS, Wi-Fi, or a fancy case to learn what mesh networking feels like.
If you know you want GPS built in — for position reporting or a portable tracker — pick the LilyGO T-Beam instead. It costs a little more but adds GPS and a larger battery-friendly layout. For a true standalone handheld with a screen and keyboard, the T-Deck is the upgrade path, but it is overkill for a first node.
The Battery
The Heltec V3 does not ship with a battery. Add a 3.7V LiPo with a JST PH 2.0 connector. A small 1000mAh cell runs a V3 for roughly a full day of occasional use; a 3000mAh cell buys you a weekend. Always confirm the polarity of the JST connector before plugging it in, because some vendors wire it reversed.
The Antenna (Do Not Skip This)
The single biggest range upgrade you can make is replacing the tiny stock antenna. A 17cm whip or a small 90-degree elbow antenna tuned for 915 MHz consistently outperforms the 2 dBi stub that comes in the box. Spend $8–12 here. Range is dominated by antenna quality and elevation, not by which radio you bought.
Flashing Firmware and Pairing With Your Phone
You do not need to install any software to flash a node. Meshtastic provides a browser-based flasher that works in Chrome or Edge over WebSerial.
- Open flasher.meshtastic.org in Chrome or Edge.
- Plug your board into your computer with a USB-C data cable (not a charge-only cable).
- Select your board model (for example, Heltec V3) and the latest stable firmware.
- Click Flash and wait for the process to finish.
- Install the Meshtastic app on your phone (iOS or Android) and pair over Bluetooth.
- Set a node name and a channel name in the app to join a mesh.
If flashing fails, the usual culprit is a charge-only cable or a driver issue. Swap the cable first — it solves the problem more often than anything else.
Setting Up Your First Node and Joining a Public Mesh
Once your node is paired, decide whether you want to run a private channel or join a public mesh. The default Meshtastic channel, LongFast, is a public channel shared by nodes across North America. Joining LongFast is the fastest way to see traffic and learn how the network behaves, and it is how most beginners send their first message.
To make your node useful to others, set its role. A client node pairs with your phone. A router or repeater node sits in a window or on a roof and relays traffic for the community without a phone attached. Even one well-placed repeater can meaningfully extend coverage for everyone around you — which is exactly the kind of self-hosted, community-first setup that fits this site.
Real-World Meshtastic Range: What to Actually Expect
Range is the question everyone asks, and the honest answer is: it depends almost entirely on line of sight. LoRa signals need a clear path between nodes. Anything that blocks that path — buildings, trees, hills, even heavy rain — cuts your range.
From real-world testing and community reports, here is what you can plan around with a stock-to-modest setup on 915 MHz:
- Urban / indoors: a few hundred meters to roughly 1 km. Walls and RF noise are the killers.